
Hello reader, In this article I will show you how can install wordpress website DigitalOcean with help of NGINX server. So, basically DigtalOcean is a cloud hosting platform, where we will host our WordPress website with NGINX server.
There are multiple reasons why you should choose Cloud hosting platform to host your wordpress and web apps. let me point out some of these for you:
- It’s fast as compared manged hosting.
- Prices are low as compared managed hosting e.g GoDaddy, etc.
- You can connect multiple domain and host multiple website.
But it’s not best for every type of people, Lets point our some cons of Cloud Hosting:
- You have to manage everything on your own. which means they just give you the server and then you have to install everything on your own e.g mysql, nginx, php etc. So, its more developer friendly.
But still if you can give some time then you can master it, but it’s all up to you.
Apart from it one thing that i can make sure is that this article will be enough for you to host your WordPress website on DigitalOcean. So, without further do lets start this article.
Install WordPress using NGINX on DigitalOcean:
First of all you will need an account on DigitalOcean in order to deploy your website over there. So, just signup and create an account on DigitalOcean: Click here to sign up

Once you have created your account then you need to create a droplet. So, basically droplet will be your cloud server where we will configure and install our wordpress. So, let’s create our Droplet first.
Creating Digital Ocean Droplet:
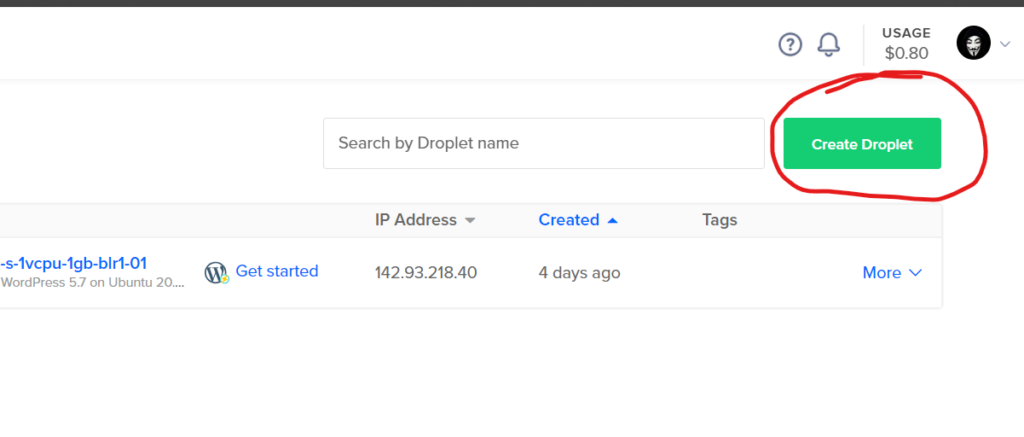
Click on create droplet button as you can see below. Then it will redirect you to plans page that they have.
In this article, we will go with 5$/month plan. Which will be enough for your website and apps. If it’s not too big.
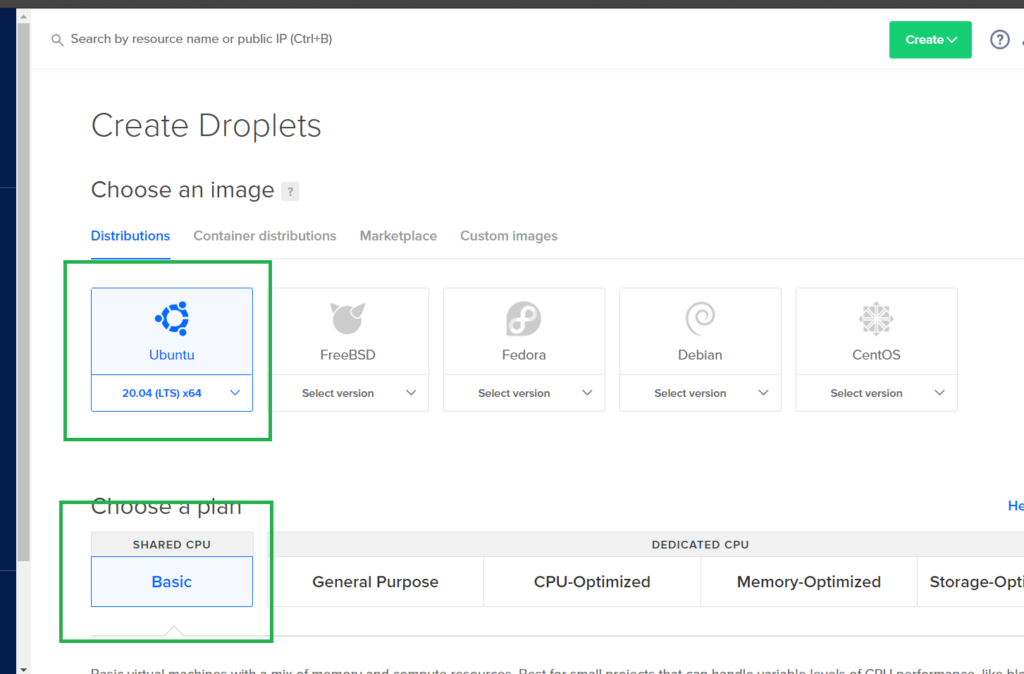
Now select ubuntu system and then choose BASIC 5$/month plan
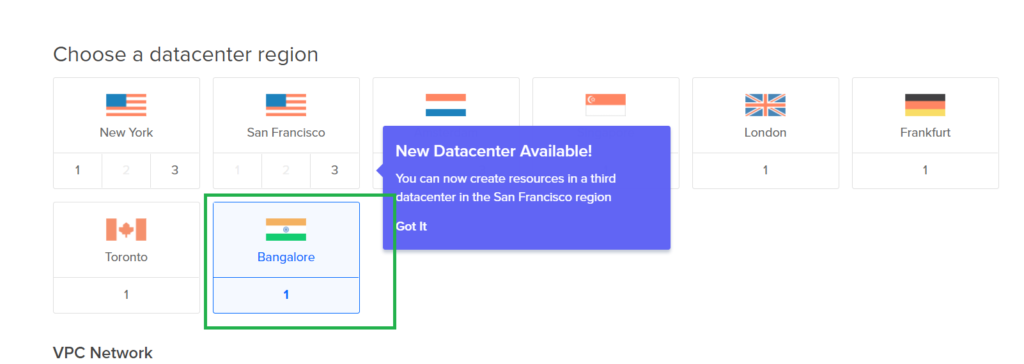
And after that Select your Data Center, Choose nearest one data center because this will affect your site. Your website speed will depend on you data center as well. Like if I’m from india then i will select banglore in my case. So, select the data center which is nearest from your location.
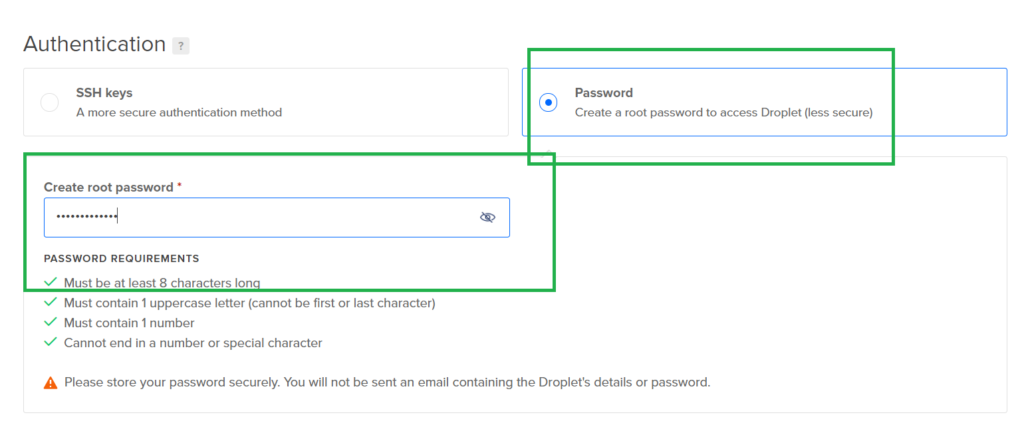
Now, finally enter the password and remember it, because we will use this password to log in to our server.
Now final step, click on create droplet button.
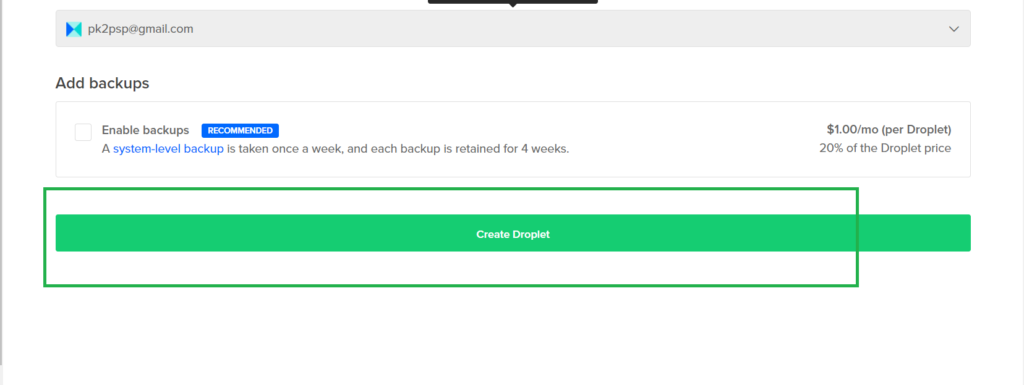
You droplet is now available in your dashboard.
Connecting Domain to Droplet:
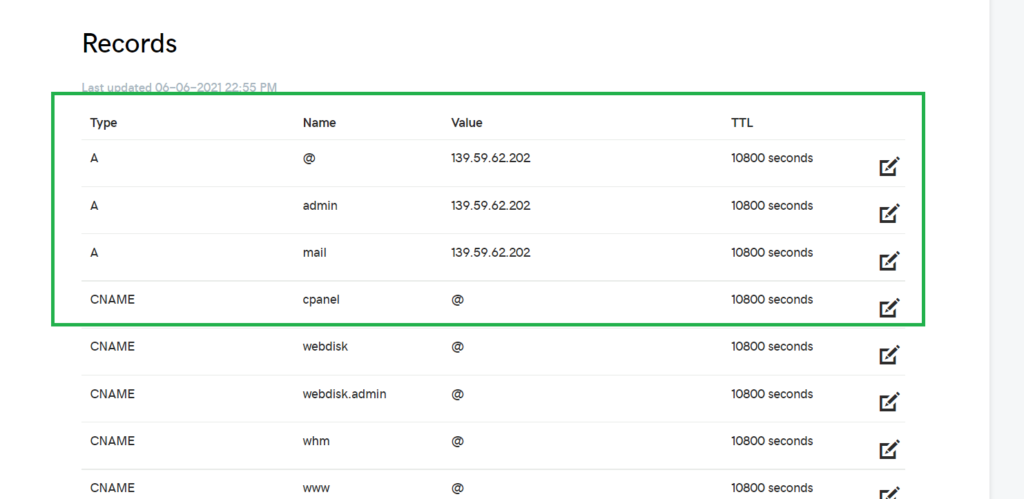
Now it’s time to connect your domain to your droplet. In order to do that, you have to update A records of your domain DNS. Lets see how to do this.
Once you’ve created your droplet then you will have an IP address of that droplet. Which you can find on droplet label or inside your droplet.

Just copy this IP Address and then go to domain dns setting. I’ve bought my domain from GoDaddy. Well, it doesn’t matter from where you bought your domain. Because every domain provider gives you the the option to update your domain DNS setting. So, simply go there and update A records and point them to your IP address. If you don’t see any a records then just create by clicking on add button.
Connecting to Our Digital Ocean Server:
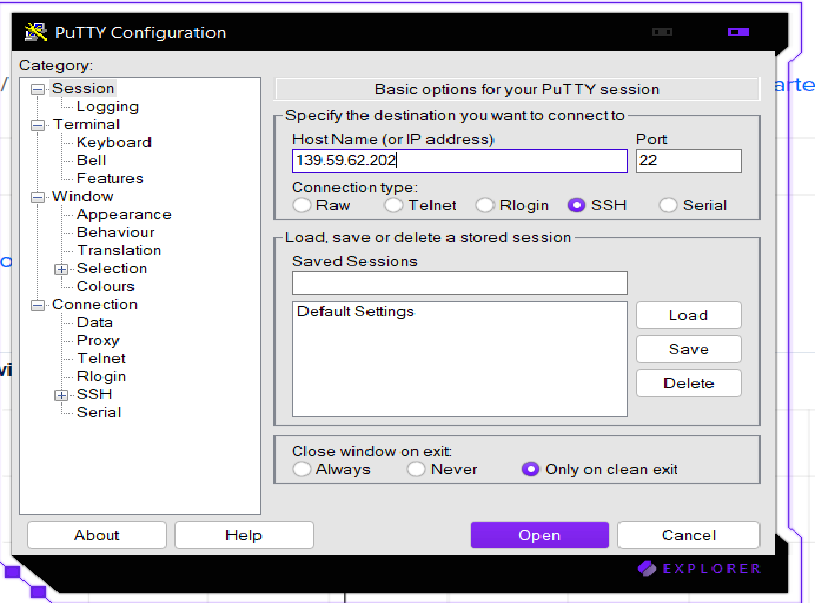
Well there are multiple ways of establishing connection to your server e.g Putty(for windows), OpenSSH, DigitalOcean console etc. But, I personally prefer putty and OpenSSH. But you can use any tool you want to connect. And if you have mac and linux then you don’t need worry about this at all. In that case you will be able to login from your terminal. But here I will use OpenSSH Client.
So, simply login to your server with your credentials. By default, the username would be ‘root’ and the password will be the one you entered before while we were creating our droplet. Command for OpenSSH and Linux based system would be.
ssh root@your_ip_addressOnce you would enter above command then it will ask for password, just enter and login into your server. But In case if you have PUTTY then open it and enter your IP ADDRESS there and click okay. Then it will ask you for username and password. Where username would be root and password that you entered.

Ant Esports KM500W Gaming Backlit Keyboard and Mouse Combo, LED Wired Gaming Keyboard, Ergonomic & Wrist Rest Keyboard, Programmable Gaming Mouse for PC/Laptop/Mac- World of Warships Edition – Black
Configuring Server and Deploying WordPress:
Now most important step, In which we will install all the required prerequisites and tools that we will need. But before that make sure you’ve logged in to your server.
And now just follow all the steps and command given below one by one.
Run these command first to update your server and installed packages:
sudo apt update
sudo apt upgrade
Install NGINX:
Now you need install NGINX. because we will use this nginx server to host our websites. Install the NGINX using following command:
sudo apt install nginxOnce you have installed nginx, then you can confirm it by checking their status. whether its running or not.
sudo systemctl status nginxEnabling UFW wall and port:
80 and 443 port should be enabled for nginx. by default, these will be disabled. But you can enable these by adding just one rule ‘Nginx Full’. Nginx full has rules for both the port.
But before that you have to enable your UFW wall.
sudo ufw enable
sudo ufw allow 'Nginx Full'
sudo ufw allow 22
Once you’ve enabled all the required ports then you can check it by using this command:
sudo ufw statusInstalling MySQL Database and Configuring:
Now we will install mysql and configure one database for our wordpress site. You can install mysql by using following command.
sudo apt install mysql-serverOnce you’ve installed your mysql then you can check it by using following command, which will show you whether your database is running or not.
sudo systemctl status mysqlNow it’s time to create our Database. but before that login into your MySQL database using following command.
sudo mysqlAnd Once you have logged inside MySQL cli then your terminal will start with mysql >. Now type following command to CREATE your new DATABASE. Don’t forget to change the name wordpress_db with your database name that you want to keep.
CREATE DATABASE wordpress_db;Now create new mysql user that we will use for our wordpress. And we will assign access of wordpress_db to this user. To create new user type following command.
CREATE USER 'wordpressuser'@'localhost' IDENTIFIED BY 'password';Don’t forget to change the name of wordpressuser with the username that you want to keep. Now finally GRANT access of wordpress_db to wordpressuser by following command.
GRANT ALL PRIVILEGES ON wordpress_db . * TO 'wordpressuser'@'localhost';And then finally type following commands.
FLUSH PRIVILEGES;
exit;
That’s it. we will use this database later while we would configure our wordpress website.
Installing PHP:
Now you need to install PHP. You can install PHP by using following command. As of now, we have latest PHP 7.4 version. But if its higher then just change 7.4 to latest version in command.
sudo apt install php7.4-cli php7.4-fpm php7.4-mysql php7.4-json php7.4-opcache php7.4-mbstring php7.4-xml php7.4-gd php7.4-curlOnce you’ve installed PHP then you can confirm it by command: php -v
Downloading and Configuring WordPress:
But before that create a folder with following command and replace the your_site.com with your domain:
mkdir /var/www/html/your_site.comLike my domain name is codechit.com then it would be like mkdir /var/www/html/codechit.com. So, once you’ve created above folder then you can get inside this folder by using following command.
cd /var/www/html/your_site.comOnce you’ve inside your_site.com folder, then type following command to download wordpress.
wget https://wordpress.org/latest.tar.gzOnce you’ve downloaded wordpress then you have to unzip it by using following command.
tar xf latest.tar.gzAbove command will extract wordpress files inside wordpress folder. but we will move these wordpress file inisde our your_site.com folder.
mv wordpress/* ./Now you can delete empty wordrpess folder and compressed file using following command, which we will not need now.
rm -r wordpress
rm -r latest.tar.gz
And now type ‘ls‘ and you will see something like this.

And now type following command to create wp-config.php with wp-config-sample.php file. Here we will give information of our database that we created.
mv wp-config-sample.php wp-config.phpAnd then type following command to edit wp-config.php file.
sudo nano wp-config.phpHere you will have to update database information with your database.
define( 'DB_NAME', 'wordpress_db' );
 /** MySQL database username */
define( 'DB_USER', 'wordpressuser' );
 /** MySQL database password */
define( 'DB_PASSWORD', 'password' );
Once it’s update with your database credentials then you can save it Ctrl + X.
Now you have to give access of www-data to your wordpress directory by using following command.
sudo chown -R www-data: /var/www/html/your_site.comConfiguring NGINX for WordPress:
Now it’s time to configure NGINX for our WordPress website. but first, you have to go inside sites-available folder by using following command.
cd /etc/nginx/sites-available/Once you’re inside ‘sites-available’ directory. then you have to create configuration file for wordpress by using following command.
sudo nano your_site.com.confAbove command will open nano editor, you have to paste following configuration here.
server {
     listen 80;
     listen [::]:80;
     root /var/www/html/your_site.com;
     index index.php index.html index.htm index.nginx-debian.html;
     server_name your_site.com www.your_site.com;
     location / {
          try_files $uri $uri/ /index.php$is_args$args;
     }
     location ~ \.php$ {
             include snippets/fastcgi-php.conf;
             fastcgi_pass unix:/run/php/php7.4-fpm.sock;
     }
}
In above code, change ‘your_site.com’ with your domain name. Once it’s done then just save it using Ctrl + X. And now you have to create symbolic link to sites-enabled folder using following command. change your_site.com to your domain.
sudo ln -s /etc/nginx/sites-available/your_site.com.conf /etc/nginx/sites-enabled/The above command will add same conf file inside sites-enabled folder. Once its done then you can check it by using command:
sudo nginx -tIf its says test pass then you can restart your server by following command.
sudo systemctl restart nginxAbove command will restart your server after that visit you website http://your_site.com and you will see something like this. Remember, you don’t have SSL certificate right now, so you won’t be able to access your site at https://.

Congrats!!!, You’ve successfully setup and installed WordPress using NGINX. In next article, I will show you how you can add free SSL certificate for your website.
You may also like: Install WordPress locally using XAMPP
I hope you liked this article. If yes then please don’t forget to share this with your friend. You can also subscribe our blog via email to get future notification from our blog.
Thank’s to read 🙂