
Hi coders, In this article we’re going to see what Linked List is and how it works. And we’ll also see a basic implementation of it in JavaScript. Although logic is same, so you can apply it anywhere.
As i already mentioned it in title that Linked List is a Data Structure but unlike an array here elements are not stored at contiguous location. So, in Linked list you can’t access specific element by using index e.g 0,1,2.. Because its not there. So, you might be wondering how it works.
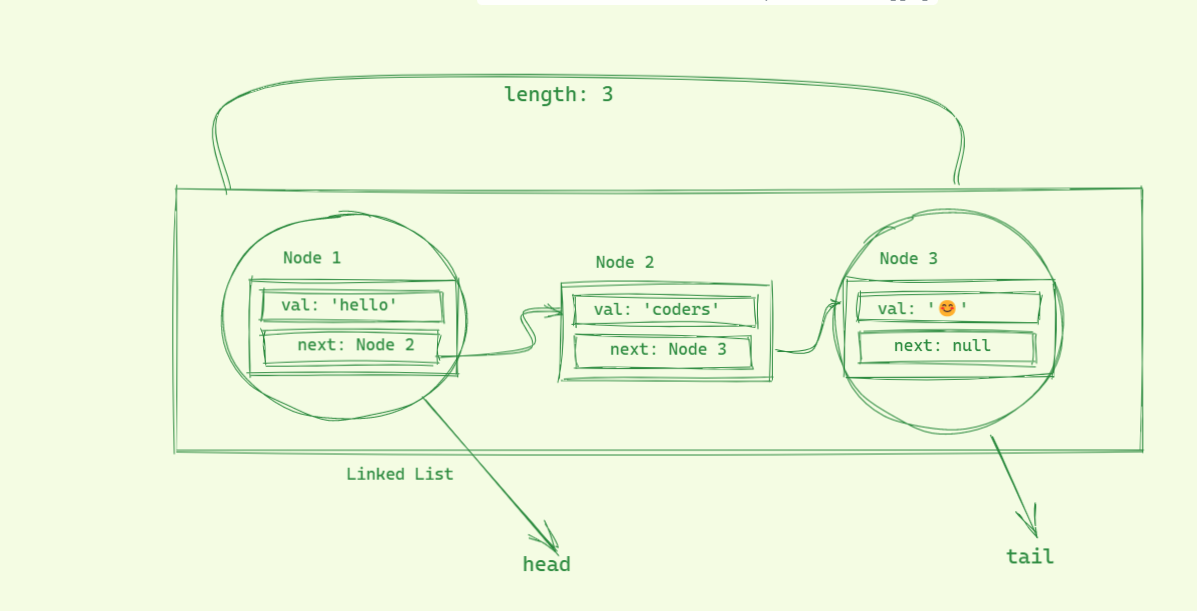
In Linked list, it’s linear connection, which means first node is connected to second and second node is connected to third and so on. Here each node consists 2 things.
- Value: Of element
- next: refrence to next node.
Here you can visualize it through this diagram:

Don’t worry if it’s still not clear to you. you will start understanding this once we reach to our implementation part. but before that lets discuss where Linked lists are useful.
Advantages and Disadvantages of Linked List:
- When you want to insert or delete something. In array, its expensive because if you want to insert something at index 0, then you have to reassign all the elements after that. basically you have to shift position of elements after that. But in Linked list, that is not the case, all you need to reach at that position and insert it.
As I pointed out one advantage so i should also list atleast one disadvantage:
- Random access is not possible in Linked List, because there is no index. So, you have to call
nextitem recursively till you reach at the node you want.
I would like to give you one example that can help you to understand it better. I heard it somewhere.
- So, think Array like a Lift where you can reach at specific floor by pressing floor no(Index).
- And Linked List like a Staircase where if you want to reach at 2nd floor then you must have to go through all the previous floors.
Implementation of Linked List in javascript:
Implementation of linked list going to be pretty much simple. Here we will have two things Node and LinkedList. We will define both of them as a Class. But before that lets see what content we’re going to store inside these Node and List.
So Our Node Class will have two basic things:
- value – value of node
- next – To keep record of next element(if any)
And Our LinkedList Class will have three things:
- head – Beginning of List [First node of list]
- tail – last node of list
- length – to keep track of how many elements do we have [As there is no way to find out length]
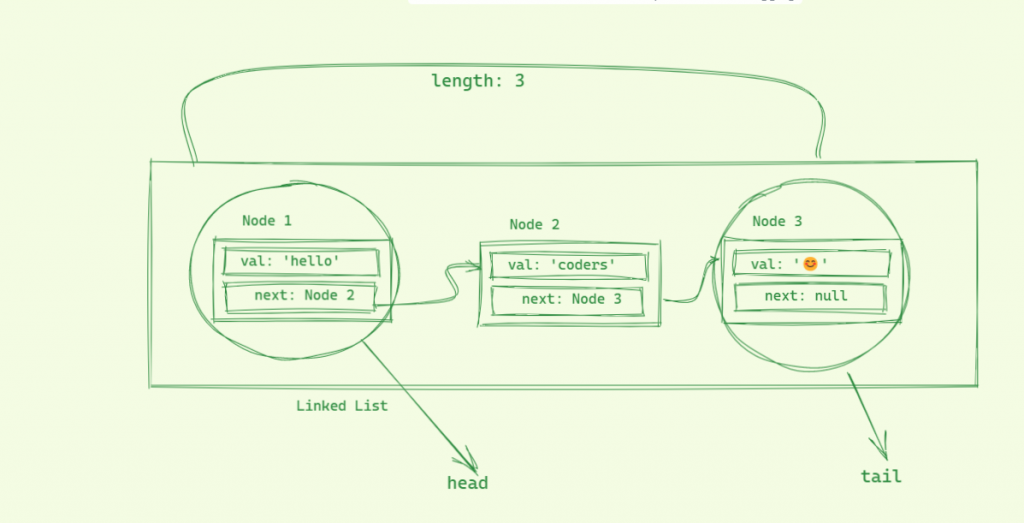
So, our diagram would look something like this:
Let’s first define our Node Class:
class Node {
    constructor(val) {
        this.val = val;
        this.next = null
    }
}
Here you can see we have a Node class with constructor that accepts value as an argument. And inside this Node constructor we have assigned value and next. next is by default null. but if there would be any next node then we would simply refrence that next node here.
Now, Let’s define our Linked List:
class LinkedList {
    constructor() {
        this.head = null;
        this.tail = null;
        this.length = 0;
    }
}
In above class, we have defined our constructor inside linked list. As you can see we have 3 properties here:
- head: to keep track of item at beginning.
- tail: to keep track of item at last index.
- length: to keep track of how many items are in our list as we don’t have indexes here.
Now we are going to add some method in our LinkedList Class that will come handy:
- push, pop, shift, unshift, get, set, insert, remove, reverse.
We are going to define these above methods one by one. and i’ll also expain how that works.
Push method
push method is going to add item at last position(right side).
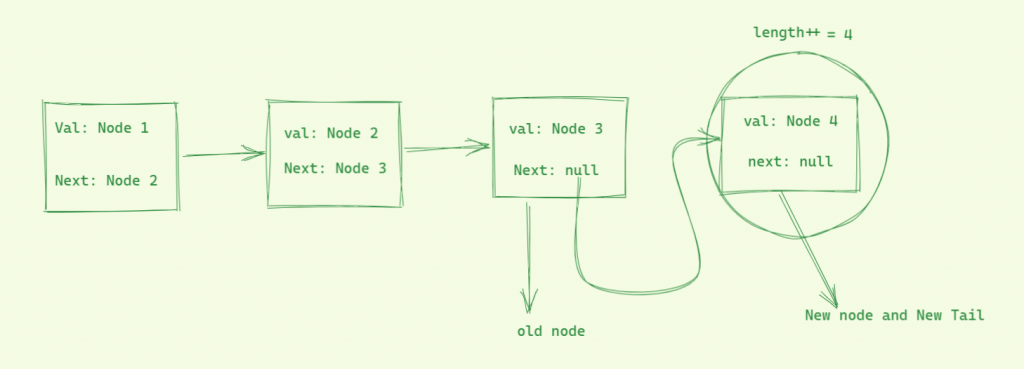
Here two cases we need to understand:
- when Linked list is empty: In this case, create a new node with Node Class and assign it to
headandtail. because when head and tail would be the same when there is only one item in list. and after that add 1 to length. - when nodes are already available: In this case, you need to take
tailand addnewNodeto itsnextproperty. After that it will automatically get updated in yourheadbecause node is refrence object. And changing Node 3 viatailwill also update the Node 3 insideheadbecause both are the same(read this to know more about refrence)
  push(val) {
        let newNode = new Node(val);
        if(this.length === 0) {
            this.head = newNode;
            this.tail = newNode;
        } else {
            // console.log('this.head', this.head)
            this.tail.next = newNode;
            this.tail = newNode;
        }
        this.length++
        return newNode
    }
So we take val as an argument and after that create a new node instance with that val. And after that if length is 0, which simply means there is no node in our list. then assing this new node to this.head and this.tail. Or else if that’s not the case then take this.tail(Last node in list) and add new node to its next property. now just replace this.tail with new node.
POp
In pop method little bit tricky. here you have to first start with first node and loop until there is next node avaialble in next property of current node, if next is avaialble then simple update the currNode with currNode.next. by doing so you will be able to reach at item, before very last node. Now simply take that node and update its next property to null. And then assign it to this.tail. And also if there is only one node then simply set you head and tail to null.
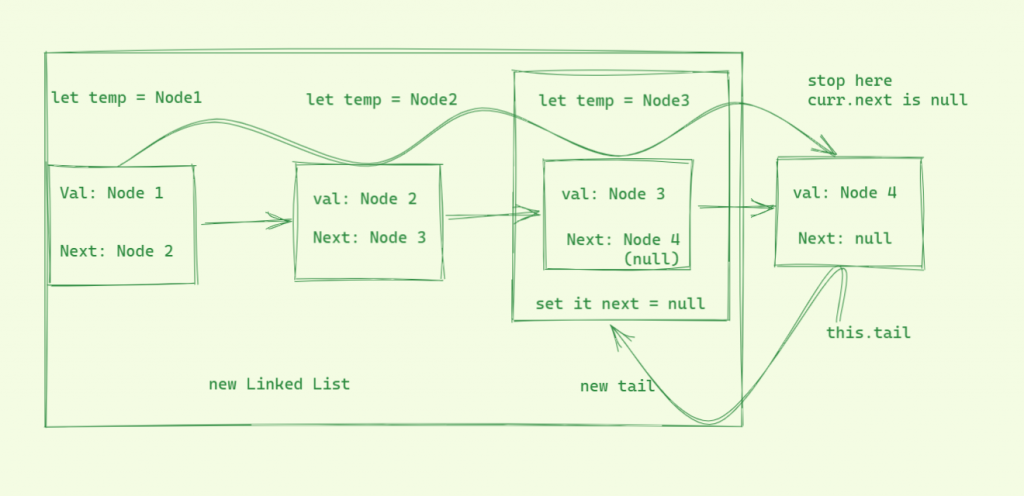
    pop() {
        if(this.length === 1) {
            this.head = null;
            this.tail = null;
        } else {
            let curr = this.head;
            let newTail = curr
            while(curr.next) {
                newTail = curr;
                curr = curr.next
            }

            this.tail = newTail;
            this.tail.next = null;
        }

        this.length--;
        return this
    }
shift
Removing new item from beginning. If you remember i said that adding and removing item from beginning in Array is expensive. But here in Linked list its very smooth. Here, all we need to do is take next item of head and store it inside a temp variable. And after that re-assign your this.head with temp.
shift() {
        if(this.length === 1) {
            this.head = null;
            this.tail = null;
        } else {
            const temp = this.head.next;
            this.head = temp;
        }

        this.length--;

        return this;
    }
Unshift
Unshift means adding a new element at beginning it. It’s also simple all you need to do is create a new node with given val. After that set next property of newly created node to this.head. And after that just update your this.head to new node. Also if list is empty then simply set this.head and this.tail to null.
unshift(val) {
        let newNode = new Node(val);
        if(this.length === 0) {
            this.head = newNode;
            this.tail = newNode;
        } else {
            newNode.next = this.head;
            this.head = newNode
        }
        this.length++
        return newNode
    }
get
get method is used to access an element at specific position. As you know that there is no index. so, in order to reach at specifc node you have to go through all the nodes from beginning once you reach at your desired destination.
here we’ll declare get method that takes position as an argument. Once we have our position then we would check first if our position is greater than 0 and less than length, and we would also make sure our length is greater than 0. If it satisfies all the conditions then we can go ahead.
After that check if current given position is equal to current this.length. if it is then it means that we can simply return our this.tail. or if its not then store your this.head in curr variable. and now write a loop let i = 1 and loop this until i is less than position. and in each iteration update you curr with curr.next. Because we’re starting with i = 1 so if you have chosen 5th position then it will loop 4 times and each time it will set curr with curr.next. which means you will have your 5th item stored in curr at the time loop will end.
    get(pos) {
        if(pos > 0 && pos <= this.length && this.length > 0) {
            if(pos === this.length) return this.tail;
            let curr = this.head;
            for(let i = 1; i < pos; i++) {
                curr = curr.next;
            }
            return curr
        }

        return;
    }
set
set is very simple, as we just defined our get method. So, all you need to do is get that Node using get method and update it with new value.
    set(pos, val) {
        let getNode = this.get(pos);
        if(getNode) {
            getNode.val = val;
            return true;
        }
        return false;
    }
Insert
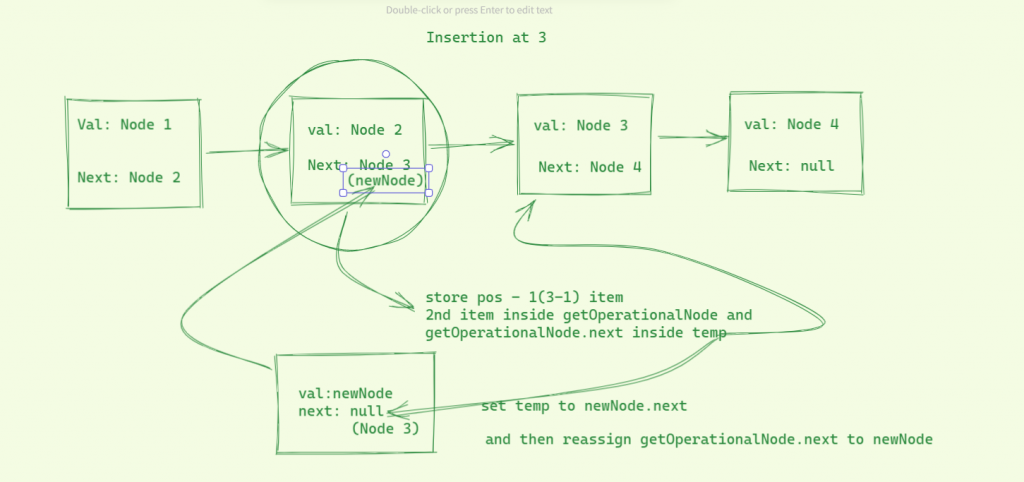
Insert is method used to add a node at specific position. Although it’s little bit complicated but not that much, if you pay attention you can easily understand it.
- here we will take pos and val as an argument.
- create a new node with given value.
- if given pos is greater than this.length, simply return false.
- if pos is equal to one then you can use you this.unshift(val) method that we have defined. because it add item at beginning.
- After that take a node at (position – 1) and store it inside
getOperationalNodevariable. - now if
getOperationalNodeis available then create its next node insidetempvaraible - and set next property of newNode to temp.
- And then set next property of
getOperationalNodeto newNode - which means newNode.next is already equivalent to temp(
getOperationalNode.next| Old one)
    insert(pos, val) {
        // here we are considering pos should be 1 to this.length
        if(pos > this.length) return false
        if(pos === 1) {
            this.unshift(val)
            return true
        }
        let newNode = new Node(val);
        let getOperationalNode = this.get(pos - 1)
        if(getOperationalNode) {
            let temp = getOperationalNode.next;
            newNode.next = temp;
            getOperationalNode.next = newNode;
            this.length++;
            return true
        }

        return;
    }
remove
remove method will be used to remove an item from specific position. It is also kind of similar like insert but easier.
- First check if position is greater than length or less than 1, in these case return false.
- or if position equal to 1 then remove item from beginning using this.shift() method and return true.
- if these were not the case then take get a node right before given position (pos – 1) and store it inisde
prevNodevariable. - Now store prevNode.next(position node) inside variable called
nodeTobeRemoved. - And then simple re assign prevNode.next to nodeTobeRemoved.next(pos + 1).
- So, you successfully removed node as you reassigned the preveNode next property with Node at position(pos + 1).
    remove(pos) {
        if(pos > this.length || pos < 1) return false
        if(pos === 1) {
            this.shift()
            return true
        }
        let prevNode = this.get(pos-1);
        if(prevNode) {
            if(pos === this.length) {
                this.pop()
            } else {
            //    let nextNode = this.get(pos + 1);
                let nodeToBeRemoved = prevNode.next
                prevNode.next = nodeToBeRemoved.next
                this.length--
            }
            return true;
        }
    }
Reverse
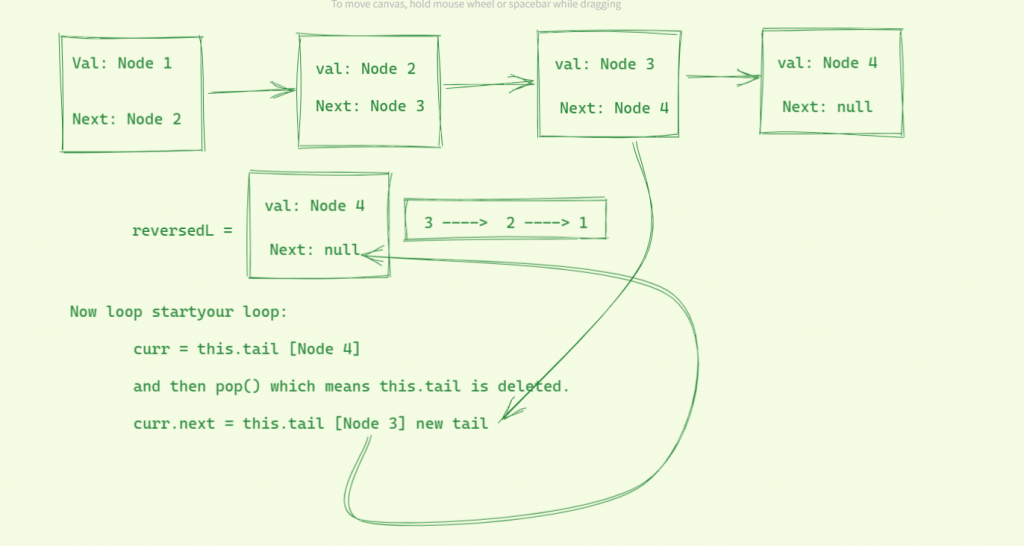
Reverse is used to reverse items avaialble in Linked List. It’s bit of tricky but not that much.
- So first thing that you need to do is store this.tail inside
reversedLvariable. - And then start loop from 1 upto length.
- Inside that loop take this.tail and store it inside curr variable
- And then call this.pop() method
- by doing so one item from list will get popped and you tail will get updated as well. But as you already stored your old tail inside
curr - then all you need to do is curr.next = this.tail. And as reversdL refrence to this.tail so updating this curr.next means it will get added inside reversedL as well
    reverse() {
        let reversedL = this.tail;
        for(let i = 1; i<this.length; i++) {
            let curr = this.tail;
            // if(curr.next) {
                this.pop(); // O(1)
                curr.next = this.tail
                this.length++
            // }
        }

        this.head = reversedL

        return this.head
    }
That’s it. now we can test our Linked List that we just created.
const lData = new LinkedList();

lData.push('1')

lData.push('2')
lData.push('3')
lData.push('4') // 1,2,3,4

lData.pop() // 1,2,3
lData.shift() // 2,3
lData.unshift('bro') // 'bro', 2, 3
lData.set(2, '!') // 'bro', '!', 3
lData.get(1) // 'bro'
lData.insert(1, 'insertCheck') // 'insertCheck', '!', 3
lData.reverse() // 3, '!', 'insertCheck'
You may also like: Wikibase SDK: Query data from Wikipedia(Wikidata)
So that’s it for today. I hope you liked this article if yes then please don’t forget to share it with your friend.
Thanks to read 🙂