Hi everybody, In todays article we’re going to discuss how you can build a chrome extension in JS. We will be using vanilla Javascript and HTML/CSS to do this. Because our extension will be built using Javascript, this is the language which we will be using to communicate with browser api(Chrome API)
But before that let’s talk about some of the basic terminologies and terms that we will be using while building our chrome extension:
- Extension: An extension is a software program that can be added to a web browser, such as Google Chrome, to enhance its functionality and add new features.
- Manifest file: A manifest file is a JSON file that contains information about the extension, such as its name, version, permissions, and content scripts. It is used by Chrome to load and configure the extension.
- Content script: A content script is a JavaScript file that runs in the context of a web page, allowing the extension to modify the page’s content or behavior.
- Background script: A background script is a JavaScript file that runs in the background of the browser, allowing the extension to perform tasks such as listening for events or making requests to external APIs.
- Popup: A popup is a small window that appears when a user clicks on the extension’s icon in the browser’s toolbar. It can be used to display information or provide user interactions.
- Chrome API: An API (Application Programming Interface) is a set of rules and protocols that allow different software applications to communicate with each other. Chrome provides various APIs that can be used by extensions, such as the tabs API, storage API, and notifications API.
Building Chrome Extension:
Before we jump into the coding part, first lets try to understand what we’re trying to build. Here we will be building chrome extension which will basically get activated through contextMenu. Whenever user will select specific text on webpage and then right click on it, they will see our chrome extension icon saying “Save Note“. And when user clicks on that save note icon then we will save that note inside chrome.storage using chrome API. and we will display that content inside poup.html when user loads it.
This entire extension will be written in manifest version 3, which is latest one. And also by the end of this article I will mention all the refrences that I’ve used in this article.
1. Manifest.json
The manifest.json file is a required file in every Chrome extension that provides important information about the extension to the browser. It is a JSON-formatted file that contains metadata such as the name, version number, and permissions required by the extension.
Here are some of the key properties that can be included in the manifest.json file:
- manifest_version: specifies the version of the manifest file format (currently either 2 or 3).
- name: the name of the extension.
- version: the version number of the extension.
- description: a brief description of the extension.
- icons: an object that specifies the icons used for the extension.
- permissions: an array of permissions that the extension requires.
- background: an object that specifies the background script for the extension.
- content_scripts: an array of objects that specify scripts to be injected into web pages.
- options_page: the URL of the options page for the extension.
- action: an object that specifies the popup window and icon for the extension’s toolbar button.
By providing this information in the manifest.json file, the browser can properly load and configure the extension.
Lets start writing code of our manifest.json:
{
  "manifest_version": 3,
  "name": "Save Note Extension",
  "version": "1.0",
  "background": {
    "service_worker": "background.js"
  },
  "permissions": [
    "contextMenus",
    "storage"
  ],
  "action": {
    "default_popup": "popup.html",

  }
}
This code sets up the basic information for the extension, including its name and version number, as well as the permissions it requires to run.
2. Background.js
The background.js file is a JavaScript file that runs in the background of the extension and can perform tasks such as listening for events or making requests to external APIs. It is typically used to manage the extension’s state and to handle tasks that need to be performed in the background, such as fetching data or updating the extension’s user interface, and it has an access of almost all chrome APIs that are available.
Here are some examples of what you might use the background.js file for:
- Listen for events such as when the extension is installed, updated, or uninstalled.
- Listen for events such as clicks on the extension’s toolbar button, changes to the user’s browsing history, or changes to the user’s settings.
- Make requests to external APIs such as retrieving data from a server or accessing a third-party service.
- Manage the extension’s state and data using the chrome.storage API.
chrome.contextMenus.create({
  title: "Save Note",
  contexts: ["selection"],
  onclick: function(info, tab) {
    chrome.storage.local.get({ notes: [] }, function(result) {
      result.notes.push(info.selectionText);
      chrome.storage.local.set({ notes: result.notes });
    });
  }
});
This code creates a context menu item that appears when the user selects text on a webpage. When the user clicks on the “Save Note” item, the selected text is saved to chrome.storage using the chrome.storage API. Now let’s jump to the part where we will be displaying our notes.
3. Popup.html
Popup.html is a HTML file that is used to create the user interface for the popup window of a Chrome extension. The popup window appears when the user clicks on the extension’s icon in the browser’s toolbar.
The contents of the popup.html file define what is displayed inside the popup window. This can include text, images, forms, buttons, and other HTML elements that are used to provide a user interface for the extension.
The popup.html file is loaded in a separate window when the user clicks on the extension’s toolbar icon, and it has access to the same Chrome extension APIs as the background script and other scripts that are part of the extension.
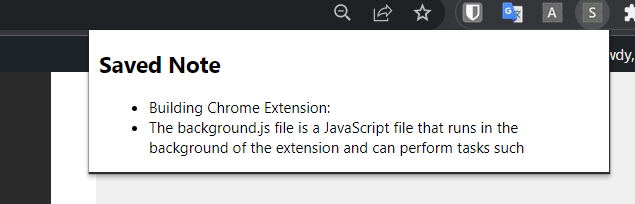
Basically we will load our stored notes from chrome.storage and will display it here whenever someone will click on popup or chrome extension icon.
<!DOCTYPE html>
<html>
  <head>
    <title>Save Note Extension</title>
    <script src="popup.js"></script>
  </head>
  <body>
    <h2>Saved Note</h2>
    <ul id="notes-list"></ul>
  </body>
</html>
And now let’s add popup.js as well so that we can access our chrome apis and manipulate them accordingly
chrome.contextMenus.create({
  title: "Save Note",
  contexts: ["selection"],
  id: "save-note-context-menu"
});

chrome.contextMenus.onClicked.addListener(function(info, tab) {
  if (info.menuItemId === "save-note-context-menu") {
    chrome.storage.local.get({ notes: [] }, function(result) {
      result.notes.push(info.selectionText);
      chrome.storage.local.set({ notes: result.notes });
    });
  }
});
In this code, the chrome.contextMenus.create() function is used to create a context menu item with an ID of “save-note-context-menu”. Then, the chrome.contextMenus.onClicked.addListener() function is used to listen for clicks on the context menu item. When the context menu item is clicked, the callback function checks the ID of the clicked item and, if it matches the ID of the “Save Note” item, saves the selected text to chrome.storage.
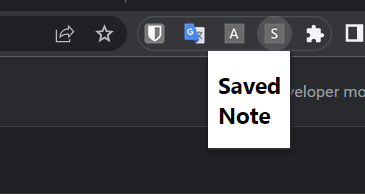
By using the chrome.contextMenus.onClicked event instead of passing an onclick parameter to chrome.contextMenus.create(), you can avoid the error and ensure that your context menu item works as intended.
After that you will see something like this
4. Test your chrome extension
To test your Chrome extension, follow these steps:
- Open the Google Chrome browser and type “chrome://extensions” in the address bar.
- Turn on Developer mode by clicking the toggle switch in the top-right corner of the page.
- Click the “Load unpacked” button in the top-left corner of the page.
- Navigate to the directory where you saved your extension and select it.
- Click the “Select Folder” button to load the extension into Chrome.
- Open a new tab and navigate to a webpage with some text.
- Select some text on the page and right-click to open the context menu.
- Verify that the “Save Note” option appears in the context menu.
- Click on the “Save Note” option to save the selected text to chrome.storage.
- Click on the extension’s icon in the browser’s toolbar to open the popup window.
- Verify that the saved note is displayed in the popup window.
Congratulations! You have now tested your Chrome extension. If everything is working correctly, you should be able to save notes and view them in the popup window.
Additional features that your can add
- Edit and delete notes: Allow the user to edit and delete their saved notes from the popup window.
- Sync notes across devices: Use the chrome.sync API to sync the user’s saved notes across multiple devices.
- Keyboard shortcuts: Allow the user to quickly save notes using keyboard shortcuts instead of the context menu.
- Highlight and annotate text: Allow the user to highlight and annotate text on webpages and save the highlighted/annotated text to chrome.storage.
- Tagging system: Allow the user to tag their saved notes for easy categorization and filtering.
- Dark mode: Add a dark mode option to the popup window to make it easier to use in low-light environments.
- Search functionality: Allow the user to search their saved notes by keyword or tag.
These are just a few ideas for additional features you can add to your Chrome extension. Depending on the specific use case of your extension, there may be other features that make sense to add as well.
Thank you for taking the time to learn how to build a Chrome extension with me! I hope you found this tutorial helpful and that you now feel confident in building your own Chrome extensions.
If you have any questions or feedback, please don’t hesitate to let me know. I’m always here to help!
Before I go, I want to remind you to subscribe to my website so that you don’t miss any future tutorials or updates. And if you want to learn more about building Chrome extensions or any other topics related to web development, be sure to check out the following resources:
- The official Chrome Extension documentation: https://developer.chrome.com/docs/extensions/
- The Chrome API reference: https://developer.chrome.com/docs/extensions/reference/
Also, if you’re interested in learning more about Wikibase SDK, be sure to check out my blog post on the topic: Wikibase SDK and How to use it
Thank you again for joining me, and happy coding! and thanks ChatGPT for assistance 😃