

Automation With Python Selenium (GUIDE):
Hey Learners, Today we’re back with interesting topic of Python Programming. In the real world, there are lots of repetitive nature of task that we’re doing again and again in same pattern. In the Python, We have a package called Selenium, Which helps us to automate some tasks that are repetitive in nature. Python Selenium specially allow us to automate browser related tasks that we’re going to learn today.
What is Browser Automation?
Browser automation is process where our bots operates our browsers as per our given instruction. We all know that Python is also popularly known for their automation task. With Python selenium, you can automate your browser for tasks like Filing Html Forms, Repetitive works and testing element, etc.
Learning Python Selenium package is whole different scenario that would take hours of time. So, here I will only give you the basic guide about specific task called Browser automation with Selenium. If you’re curious about learning this selenium then read the blog up to the end.
Prerequisite:
- Python(installed)
- Selenium Package(Installed) – pip install selenium
Now let’s begin our basic guide about Python Automation with selenium.
First, We need to download compatible Web-Driver of respective browser in order to automate our browser. Below, you can have download web-driver of your respective browsers.
Because I have chrome browser therefore I will download Web Driver of chrome browser. Please confirm the version of your browser that you’re using before downloading their driver.
Once you will have downloaded Web Driver of your respective browser then just you have to put it on the right place. In Windows, You need to extract your chromedriver.exe inside the C:/ Drive. But If you have a mac then copy it into “cp chromedriver / usr/local/bin/” directory.
Browser Automation Coding:
Now our coding part will start. Let me tell you that what we’re going to automate today with Python Selenium.
In this automation, our code will open the GitHub website and then It will click on the login button. After then it will find username and password box and fill-up the credentials that we defined in our code. In the last, it will submit and logged into that users account.
First Let me show you my code that I’ve written to automate above task, after then I’ll break and explain each and every line of code.
Browser Automation(Python Code):
from selenium import webdriver

PATH = "C:\chromedriver.exe"
browser = webdriver.Chrome(PATH)
browser.get('https://github.com')

sign_in = browser.find_element_by_link_text('Sign in')
sign_in.click()

username_box = browser.find_element_by_id('login_field')
username_box.send_keys('your username')

password_box = browser.find_element_by_id('password')
password_box.send_keys('Your Password')
password_box.submit()
Let’s Define each line of code one by one.
In Line 1, First We have to import webdriver class from selenium module. Then we to store our path location of web driver into variable(PATH). So that we can use this path later on in this code.
In Line 4, Here enter your Path parameter into Chrome(PATH) method of webdriver class. Then stored it into variable called browser. So, that we’re able to access our webdriver.
In Line 5, You need to use get(url) method to open your url into your web-driver that we have stored in our browser variable. Which means browser.get(‘https://github.com/’) will open this website into our automated chrome browser.
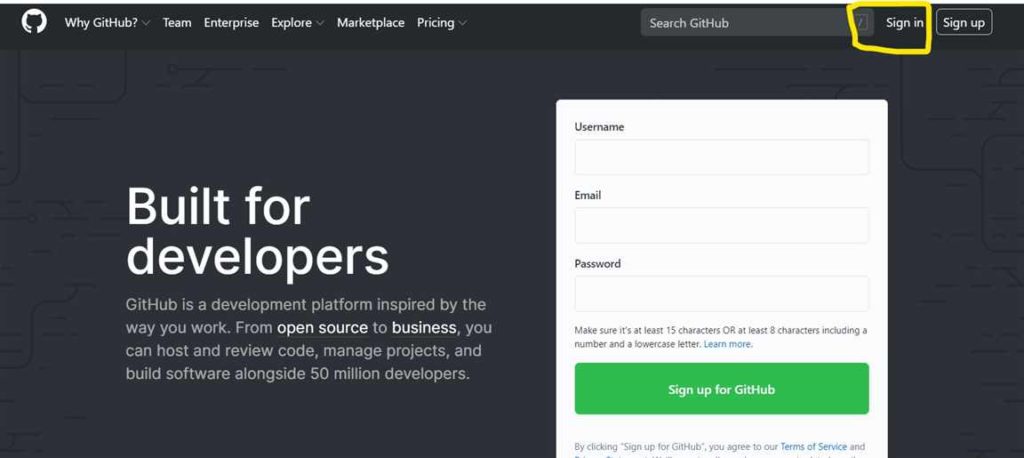
In Line 7, We have used find_element_by_link_text(‘Sign in’) to find Sign in text that contains link on our homepage. Because In homepage of github, we have only one ‘Sign In’ text that contains link.
In Python we can have access element by various methods e.g link text, class, id, tag name, xpath, css selector etc.
In Line 8, we will perform click action on the sign_in variable by using click() method. Because In sign_in variable, we have stored our Sign in link text.
Login Automation(GitHub):
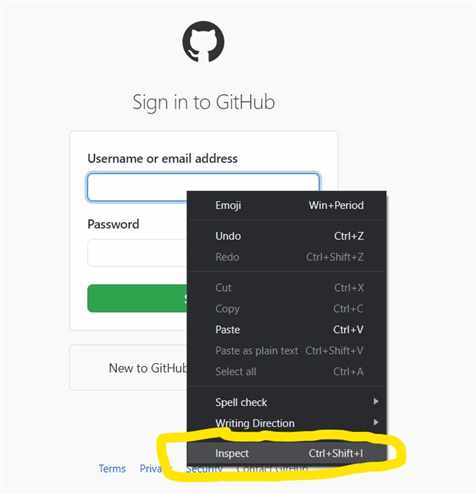
In login Page of GitHub, Now you need to inspect element to find class or id of username or password input box. In chrome browser, right click and then click on inspect button. Here you can find that what input box contains what class or id.
Now we will find ‘id’ attributes of both username and password input box. So that we can find element in our code by using that particular id.
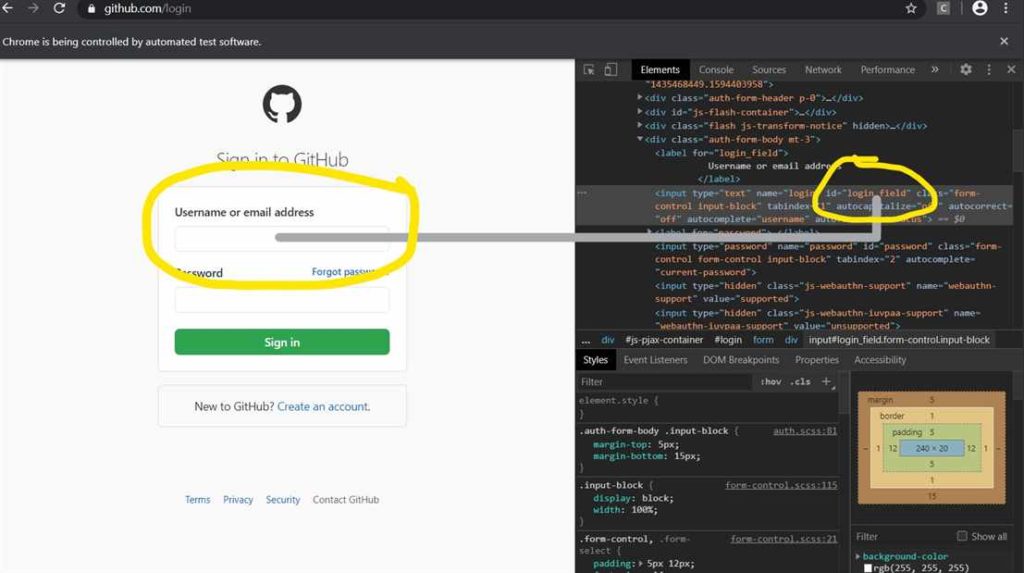
Now, we have both ‘id‘ attributes for both input field like username and password. For Username (id = ‘login_field’) and password(id = ‘password’). Now let’s continue our code.
In Line 10, We will find username field by using find_element_by_id(‘login_field’) and stored this element into variable called username_box.
In Line 11, Now we need to send text or string to that username field. Here we have send_keys() method to send our username to username_box. you need to define your username of github inside your send_keys(‘username‘).
In Line 13,14 , We will apply same trick as Line 10,11 to find password field and sending our password.
In Line 15, You just need to call submit() method on our passoword_box to submit this form.
That’s it. Now run your code and you will see our code will automatically open the browser, click on the link and fill up the details as per given instruction in our code.
You May Also Like: Web Scrapping Basic Guide With Python Language(Read)
So, I hope You got something useful and interesting from here. if you want to learn programming, frameworks and new technologies then please don’t forget to subscribe this blog.
We’re uploading such kind of programming related contents on daily basis. Don’t forget to recommend this blog to your friends too.
Thank’s To Read…